


Data entry is something we’re all familiar with - it’s time consuming, and requires a lot of effort to maintain. By automating data entry businesses can ensure they have accurate and relevant data to base decisions on, and save time for their employees. In this article we will describe the benefits of automating data entry in Salesforce on one Object (Contacts), using values from another related Object (Opportunities); more specifically for multi-select picklist fields storing information about service interests.
With this solution, instead of having salespeople manually enter the services their Contacts are interested in, their Contact’s service interests will be automatically fetched from Opportunities related to the Contacts. The Opportunities store information about services (= Opportunity Line Items) that the Contacts will/might purchase and/or have purchased in the past. This information is automatically passed to a field called “Service Interests” on related Contacts.
Not only does this solution eliminate the manual data entry step- but also salespeople no longer have to go elsewhere in Salesforce (i.e. report, list view, opportunity related list) to find what services their Contacts are interested in. In addition, this is a great benefit for marketeers that can use this information to segment in their marketing efforts to market the right services to the right customers.
Article contents:
Part 1: Business use case for automatically passing multi-select field values to Contacts from related Opportunities
Part 2: Build a solution step-by-step using Salesforce Flow Builder
Part 1: Automatically pass multi-select field values to Contacts from related Opportunities
Business Use Case
In this scenario, there is a business need to automatically pass the values from a field containing information about services on Opportunities to their related Contacts. The data type of this field is “Picklist (Multi-Select)”.
The User Stories* formulated for this scenario were:
User Story 1: “As a Sales User, I want services that my Contacts have shown interest in via Opportunities to be displayed on the Contact Page Layout as a field called ‘Service Interests’ and I also want to be able to edit this field to manually add/remove services if needed, so that that I do not have to go elsewhere (report, list view, opportunity related lists etc.) to find this information about my Contacts.”
User Story 2: “As a Marketing User, I want to see what services Contacts have shown interest in, so that I can easily segment in my marketing efforts to market the right services to the right customers.”
*A user story is an informal, general explanation of a software feature written from the perspective of the end user or customer. They typically follow this simple structure: As a < type of user >, I want < some goal > so that < some reason >
Business value of the automated solution
- Data accuracy and relevance: Instead of relying on manually entered data, the data will be populated from a reliable source
- Timesaving: Reduced amount of manual work spent on data entry and finding the correct data across multiple records
Business scenario: What the process looks like before automation is implemented:
Emma Smith is a salesperson and the owner of the contact Jack Rogers in Salesforce, who works at Burlington Textiles Corp of America. Emma is preparing for a sales meeting with Mr. Rogers and needs to know what services he has previously shown interest in so that she can prepare accordingly.
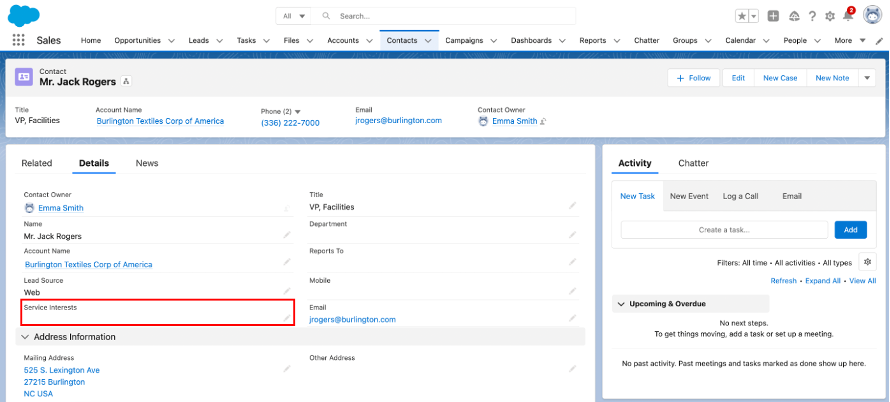
The field “Service Interests” on Mr. Rogers’ contact record is empty, so Emma has to manually look around for this information in Salesforce. The services that Mr. Rogers has shown interest in are stored on all Opportunities related to Mr. Rogers’ contact record in Salesforce in a field called “Services”. However, Mr. Rogers’ contact record is associated with 20+ Opportunities, so to find this information Emma has the following options:
- Go to the related list and look at each of the 20+ Opportunities associated with Mr. Rogers’ contact record
- Create a report for the 20+ Opportunities associated with Mr. Rogers’ contact record
- Create a list view for the 20+ Opportunities associated with Mr. Rogers’ contact record
Then she must find what services each Opportunity has related to it, and populate the Service Interest field on Mr. Rogers’ contact record with the same information
Summary: The options described above are time-consuming. A salesperson must manually look around for the right information in Salesforce and then manually enter the data on the Opportunity. This is a time-consuming task and also comes with the risk of wrong data entry or missing data, if the salesperson does not find all the information needed/overlooks some data.
Business scenario: What the process looks like after automation is implemented:
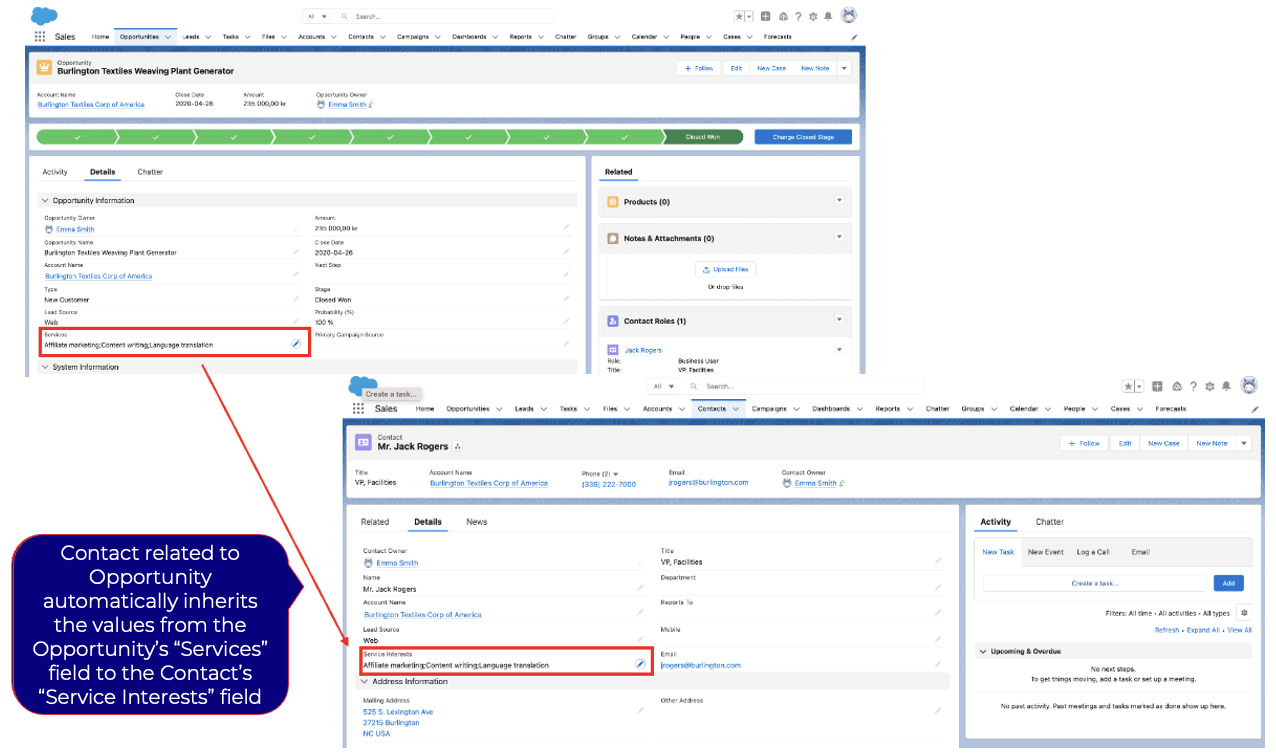
With automation implemented, the Services data from Opportunities related to Mr. Rogers’ contact record will be automatically passed to the Services Interest field on Mr. Rogers’ contact record.
This means Emma can simply open Mr. Rogers’ contact record in Salesforce and see the information she needs directly on the contact record. If needed, she can also add additional Service Interests directly to the Service Interest field on the contact record. The automation ensures data accuracy and saves administrative time for Emma who can now focus on what she prefers: selling.
Part 2: Build a step-by-step solution using Salesforce Flow Builder
Building a solution that passes multi-select values to Contacts from related Opportunities:
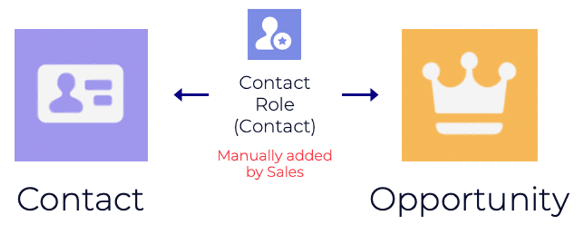
The logic behind this solution can be implemented when multi-select values from Opportunities need to be passed to related Contacts. To understand the logic behind the solution, it’s important to understand the relationship between Opportunities and Contacts in Salesforce.
In Salesforce, there is no direct relationship between Contacts and Opportunities. Opportunities have a relationship with Accounts, and Accounts have a relationship with Contacts. The standard Object ‘Opportunity Contact Role’ creates a link between Contacts and Opportunities, which defines the relationship between them.
To learn how to ensure that your sales team adds Contact Roles to their Opportunities, have a look at this article.
Outlined requirements and technical solution overview:
In this specific case, we will describe how to automatically pass values from the multi-select picklist field “Services” on Opportunities to related Contacts using Flow Builder.
Summary of requirements:
- The multi-select picklist field “Service Interests” on Contacts automatically inherits the values from the corresponding multi-select picklist field “Services” on related Opportunities
- Salesforce Users should be able to add and remove values from the multi-select picklist field “Service Interests” on the Contacts
Summary of technical solution:
- Create a multi-select picklist field called “Service Interests” for the Contact Object and add to the Contact Page Layout
- Install multi-select picklist parsing app from Salesforce AppExchange
- Create a record-triggered flow that populates the multi-select picklist field “Service Interests” on the Contact with values from the field “Services” on Opportunities related to the Contact, when new values are added to an Opportunity’s “Services” field
Pre-requisites:
- The corresponding multi-select picklist field (“Services”) on Opportunity exists
- The global picklist value set (“Services”) for the multi-select picklist field exists
- There is an automation in place where the field “Services” on Opportunity is automatically populated with the Services (= Opportunity Line Items) related to the Opportunity
Configuring the technical solution
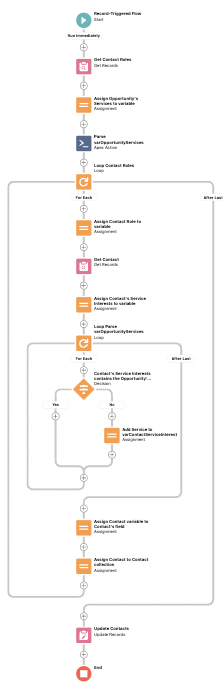
What the completed flow will look like:
Step 1: Create the multi-select picklist field for the Contact Object
1.1. Create a field with the data type “Picklist (Multi-Select)” for the Contact Object and name it “Service Interests”. Use a global picklist value set containing Service values (see pre-requisites)
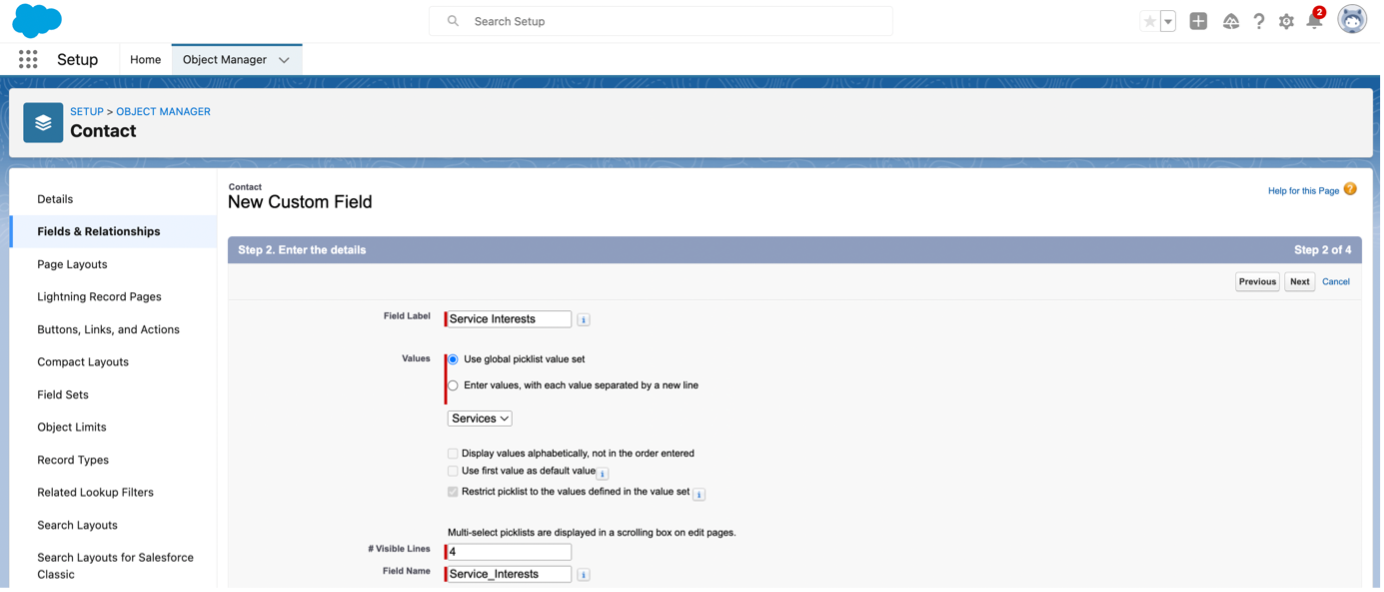
1.2. Add the field to the Contact Page Layout
Step 2: Install multi-select picklist parsing app from Salesforce AppExchange
2.1. Install the un-managed package:
Production: https://login.salesforce.com/packaging/installPackage.apexp?p0=04t4K000002Jnkt
Sandbox: https://test.salesforce.com/packaging/installPackage.apexp?p0=04t4K000002Jnkt
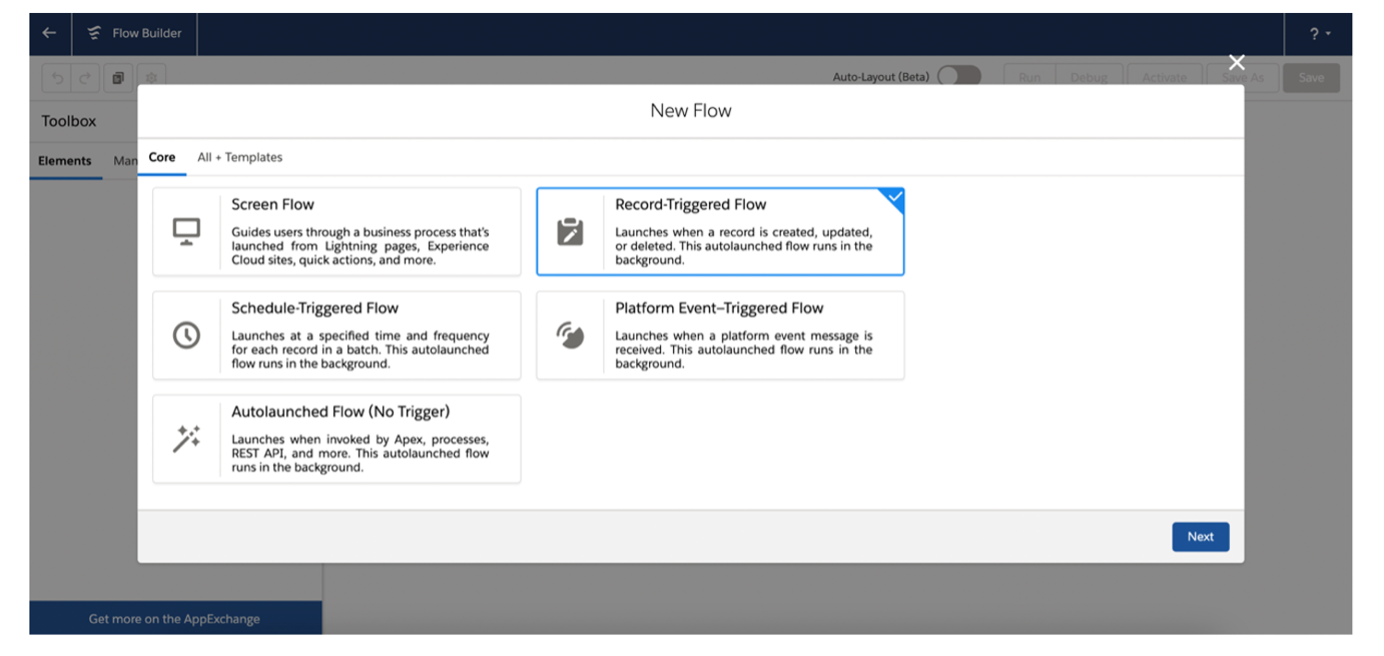
Step 3: Create a Flow that passes the multi-select picklist values of Contacts from related Opportunities, when Opportunities are closed
3.1. First, create a Record-Triggered Flow
3.2. Configure the trigger and choose the Object in the ‘Start’ Element
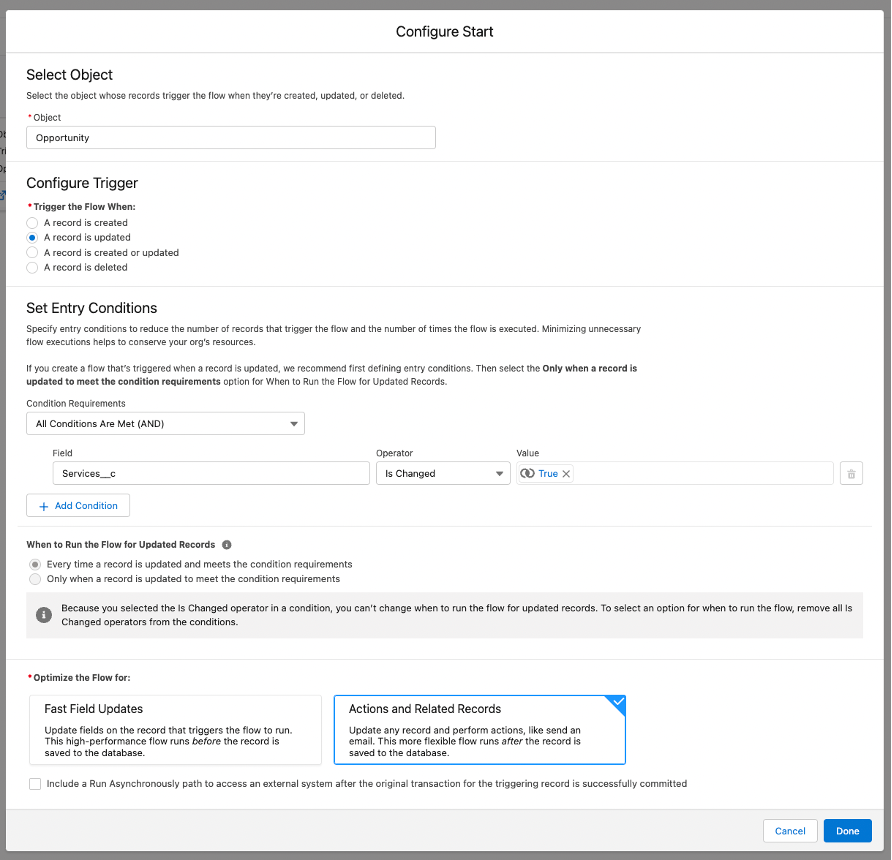
- Object: Opportunity
- Trigger the Flow When: A record is updated
- Condition Requirements: Services__c Is Changed = True
- When to Run the Flow for Updated Records: Every time a record is updated and meets the condition requirements
- Optimize the Flow for: Actions and Related Records
3.3. Create the following Variables by going to the Manager tab and clicking ‘New Resource’ for each new Variable:
A variable that will store information about the Contact:
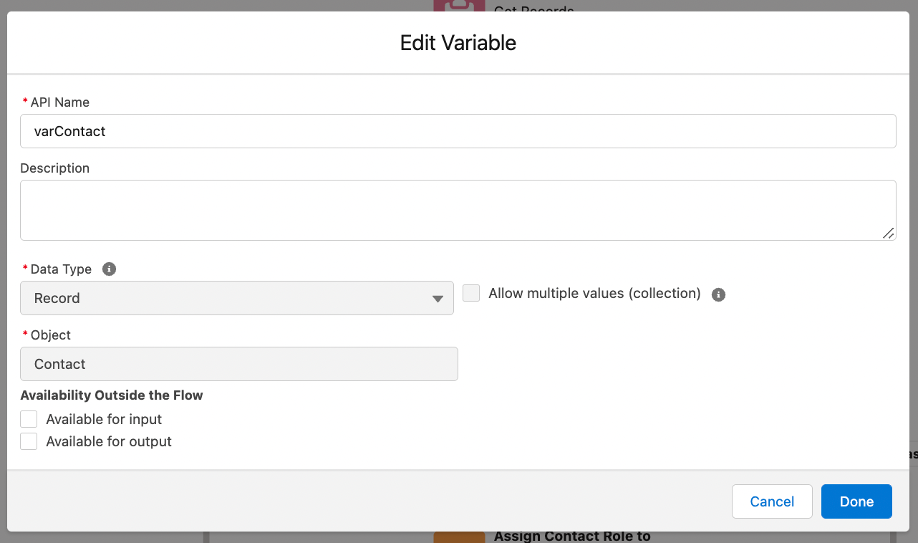
- Resource Type: Variable
- API Name: varContact
- Data Type: Record
- Object: Contact
A variable that will store all Contacts in one collection:
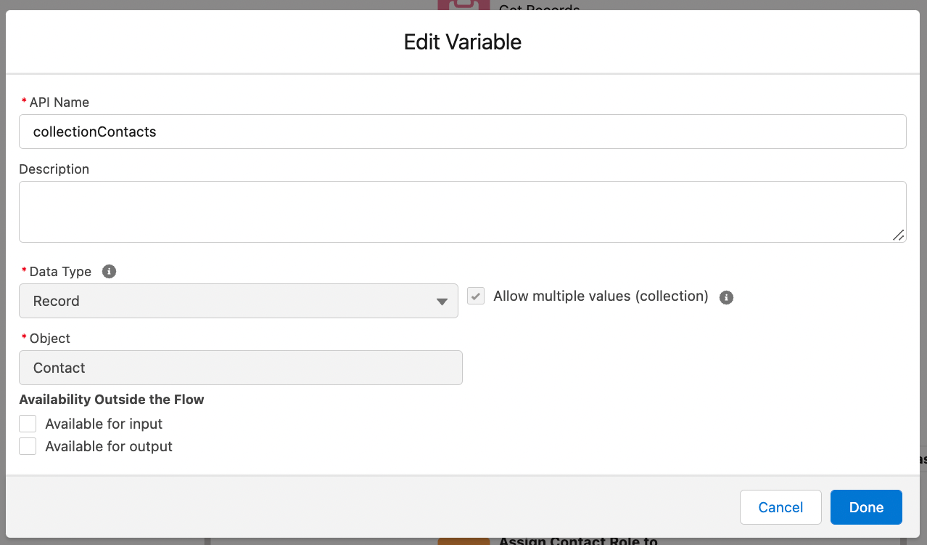
- Resource Type: Variable
- API Name: collectionContacts
- Data Type: Record
- Object: Contact
- Allow multiple values (collection) = True
A variable that stores the Contact’s Service Interest values:
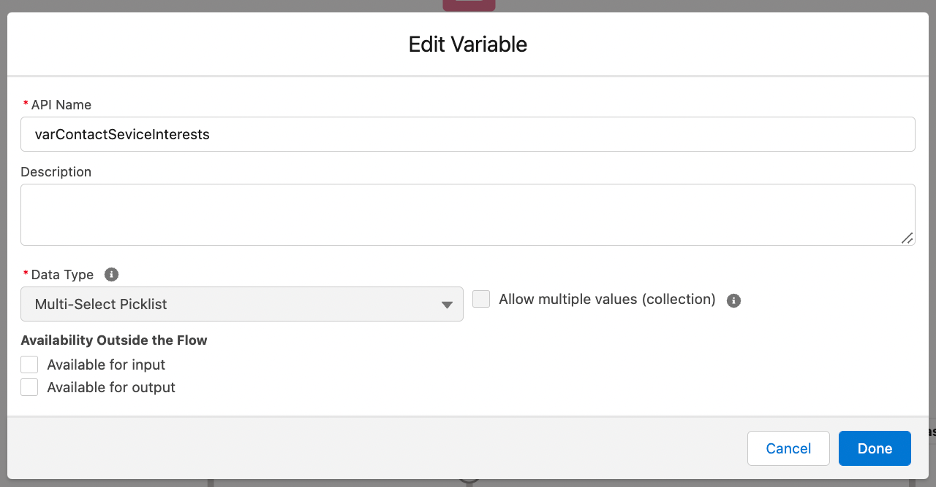
- Resource Type: Variable
- API Name: varContactServiceInterests
- Data Type: Multi-Select Picklist
A variable that stores the Opportunity’s Services values:
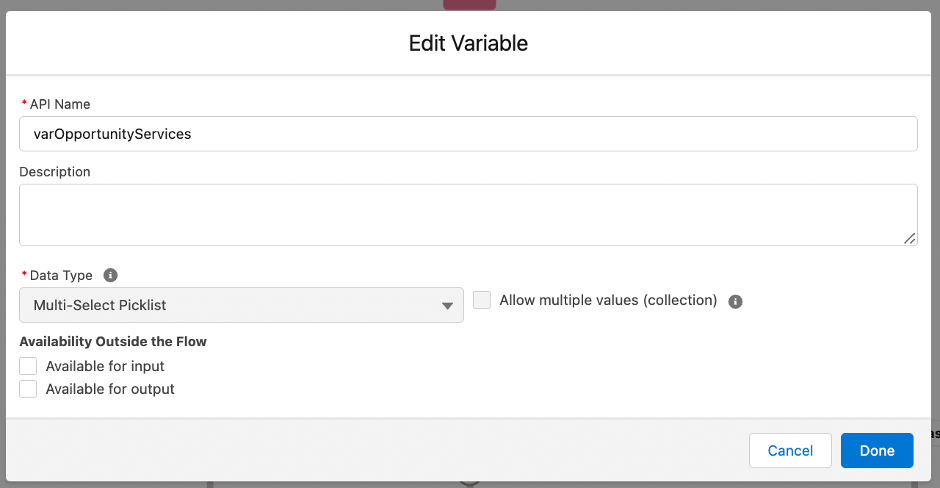
- Resource Type: Variable
- API Name: varOpportunityServices
- Data Type: Multi-Select Picklist
3.4. Add a ‘Get’ Element to the canvas with the following configurations:
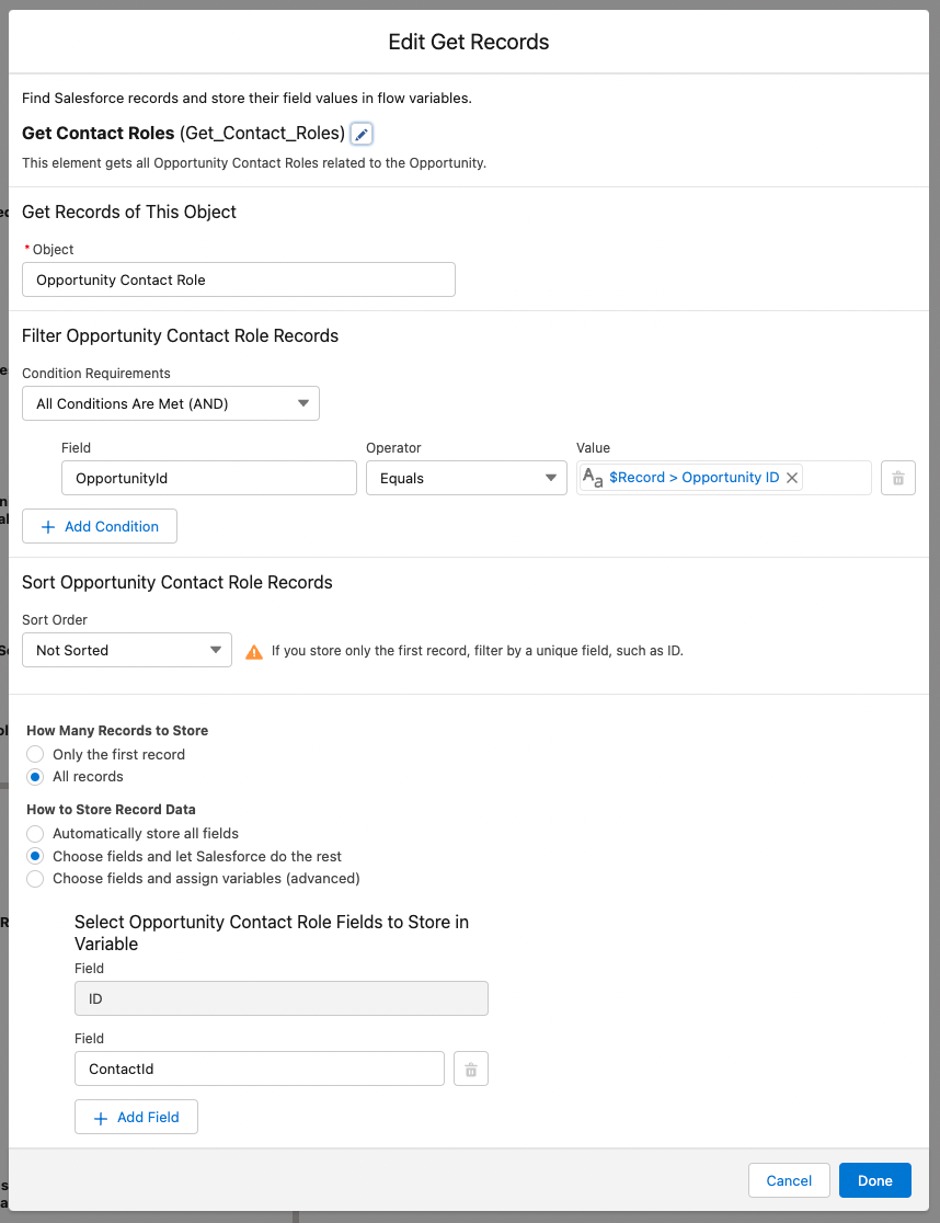
- Label: Get Contact Roles
- Description: This element gets all Opportunity Contact Roles related to the Opportunity.
- Object: Opportunity Contact Role
- Condition Requirements: All Conditions Are Met (AND)
- Field: OpportunityId
- Operator: Equals
- Value: {!$Record.Id}
- How Many Records to Store: All Records
- How to Store Record Data: Choose fields and let Salesforce do the rest
- Field: ContactId
3.5. Add an ‘Assignment’ Element to the canvas with the following configurations:
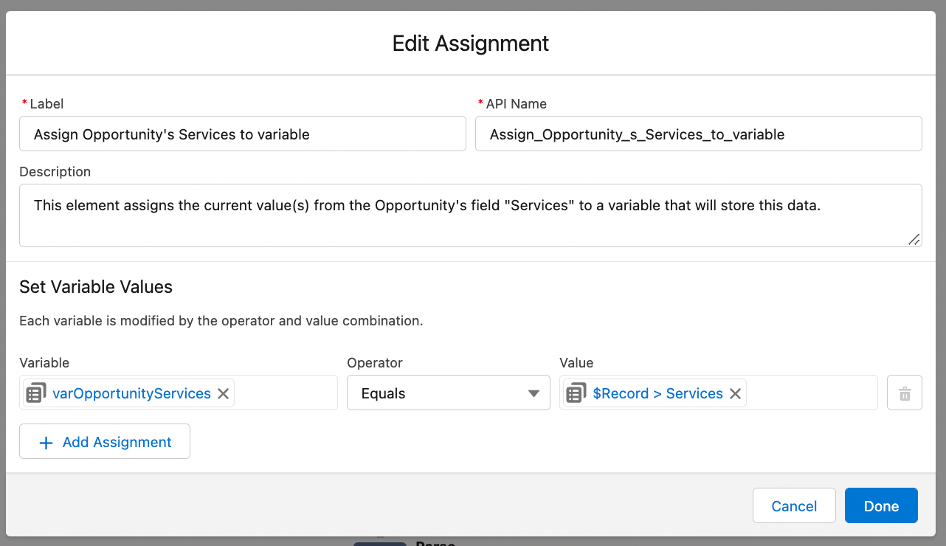
- Label: Assign Opportunity's Services to variable
- Description: This element assigns the current value(s) from the Opportunity's field "Services" to a variable that will store this data.
- Variable: varOpportunityServices
- Operator: Equals
- Value: {!$Record.Services__c}
3.6. Add an ‘Apex Action’ Element to the canvas with the following configurations:
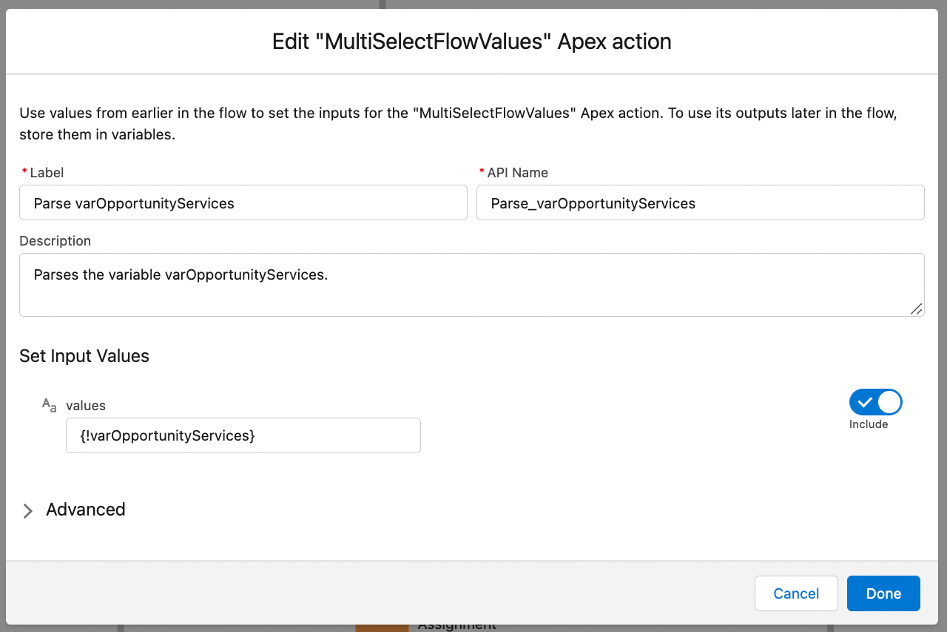
- Label: Parse varOpportunityServices
- Description: Parses the variable varOpportunityServices.
- Include = True
- Values: {!varOpportunityServices}
3.7. Add a ‘Loop’ Element to the canvas with the following configurations:

- Label: Loop Contact Roles
- Description: This element loops through each Opportunity Contact Role one by one.
- Collection Variable: {!Get_Contact_Roles}
3.8. Add an ‘Assignment’ Element to the canvas with the following configurations:
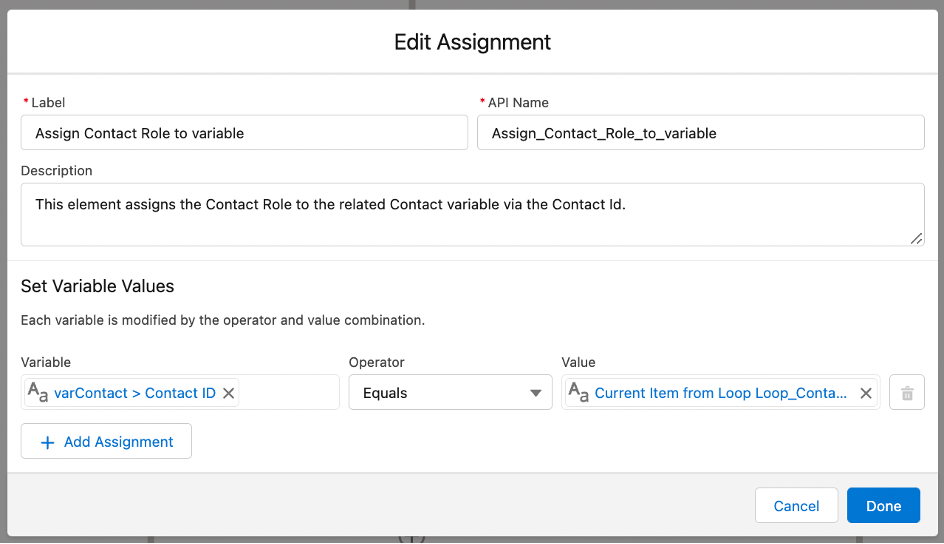
- Label: Assign Contact Role to variable
- Description: This element assigns the Contact Role to the related Contact variable via the Contact Id.
- Variable: {!varContact.Id}
- Operator: Equals
- Value: {!Loop_Contact_Roles.ContactId}
3.9. Add a ‘Get’ Element to the canvas with the following configurations:
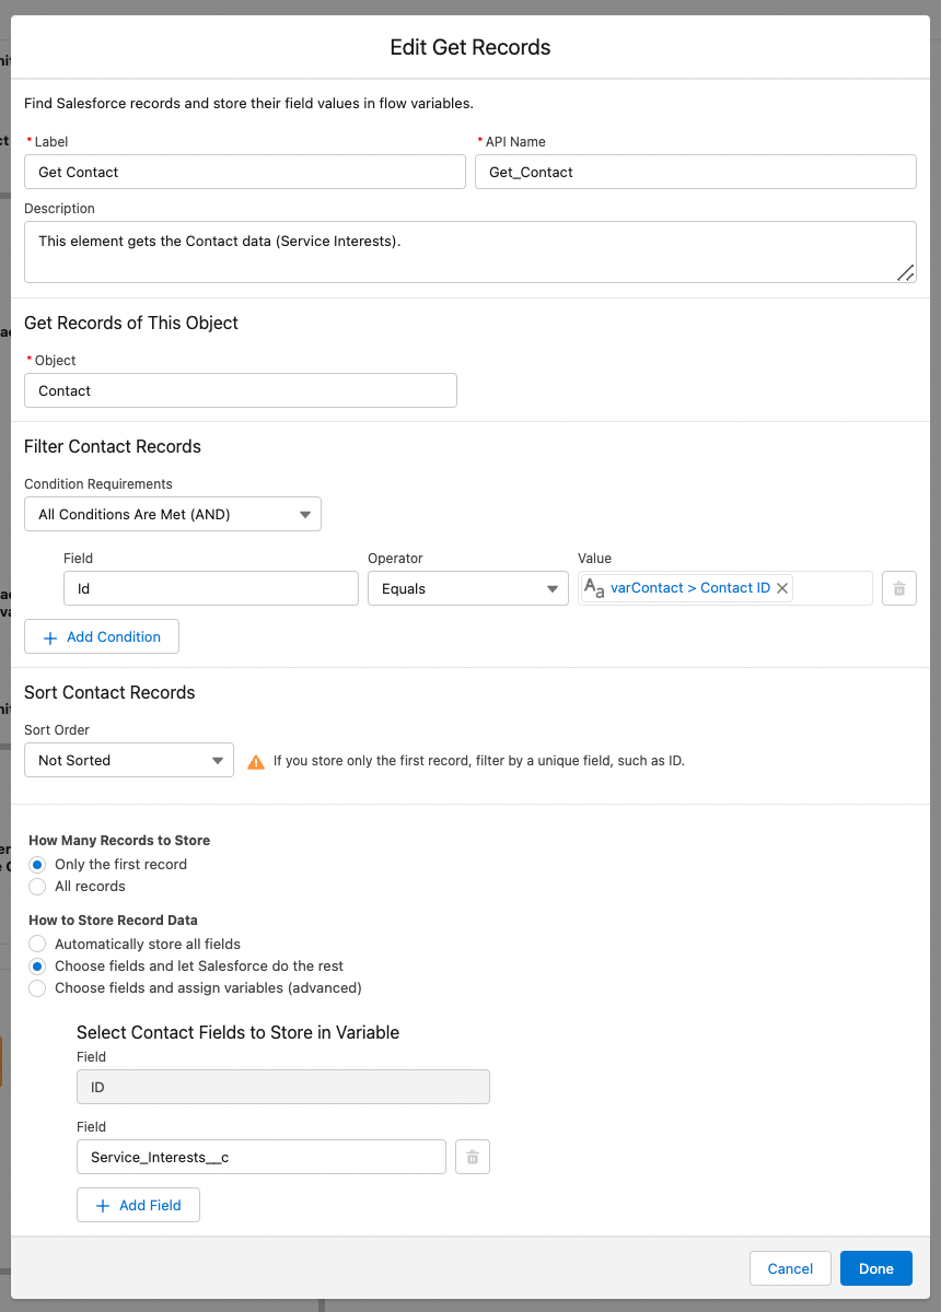
- Label: Get Contact
- Description: This element gets the Contact data (Service Interests).
- Object: Contact
- Condition Requirements: All Conditions Are Met (AND)
- Field: Id
- Operator: Equals
- Value: {!varContact.Id}
- How Many Records to Store: Only the first record
- How to Store Record Data: Choose fields and let Salesforce do the rest
- Field: Service_Interests__c
3.10. Add an ‘Assignment’ Element to the canvas with the following configurations:
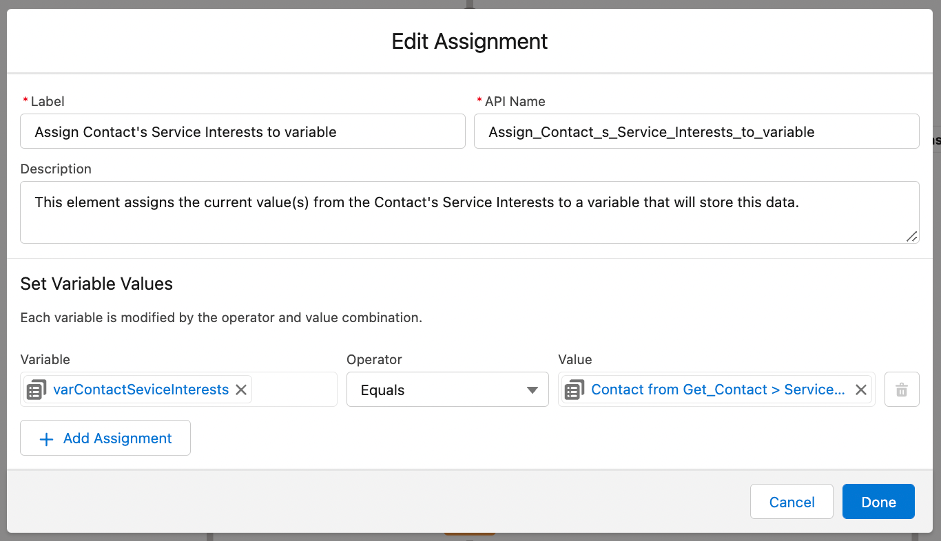
- Label: Assign Contact's Service Interests to variable
- Description: This element assigns the current value(s) from the Contact's Service Interests to a variable that will store this data.
- Variable: {!varContactSeviceInterests}
- Operator: Equals
- Value: {!Get_Contact.Service_Interests__c}
3.11. Add a ‘Loop’ Element to the canvas with the following configurations:
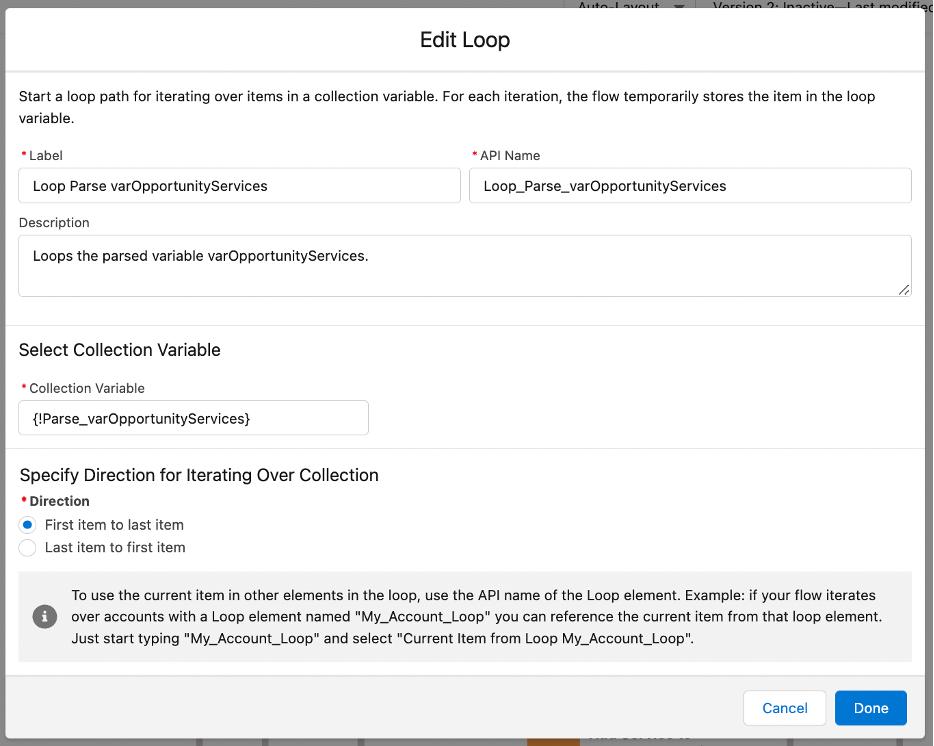
- Label: Loop Parse varOpportunityServices
- Description: Loops the parsed variable varOpportunityServices.
- Collection Variable: {!Parse_varOpportunityServices}
3.12. Add a ‘Decision’ Element to the canvas with the following configurations:
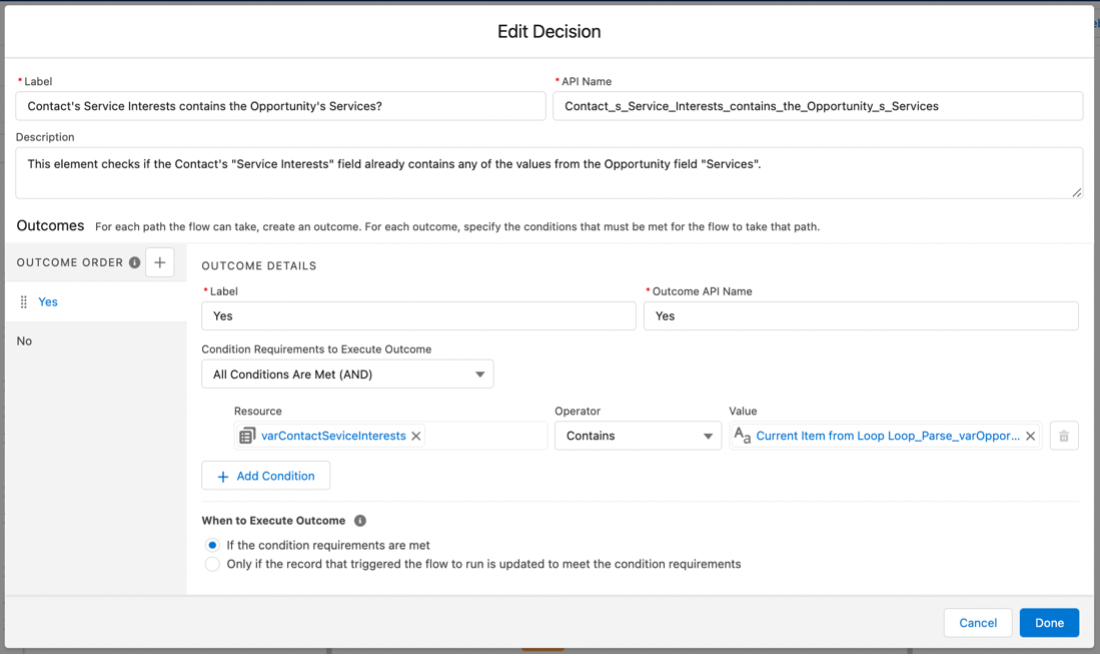
- Label: Contact's Service Interests contains the Opportunity's Services?
- Description: This element checks if the Contact's "Service Interests" field already contains any of the values from the Opportunity field "Services".
- Outcome order 1 Label: Yes
- Condition Requirements to Execute Outcome: All Conditions Are Met (AND)
- Resource: {!varContactSeviceInterests}
- Operator: Contains
- Value: {!Loop_Parse_varOpportunityServices}
- Outcome order 2 Label: No
3.13. Add an 'Assignment’ Element after the ‘No’ Outcome to the canvas with the following configurations:
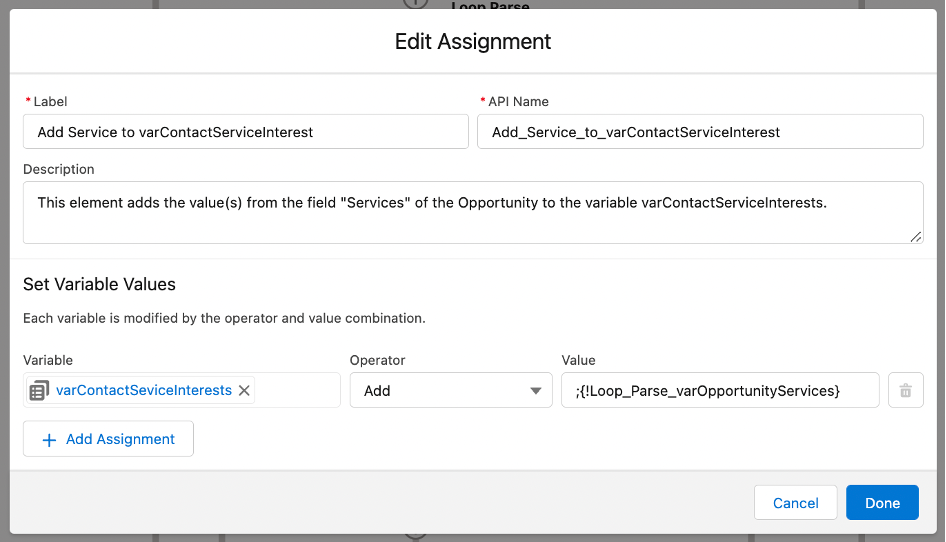
- Label: Add Service to varContactServiceInterest
- Description: This element adds the value(s) from the field "Services" of the Opportunity to the variable varContactServiceInterests.
- Variable: {!varContactSeviceInterests}
- Operator: Add
- Value: ;{!Loop_Parse_varOpportunityServices}
3.14. Add an 'Assignment’ Element after the ‘Loop Parse varOpportunityServices’ Loop’s Last Item to the canvas with the following configurations:
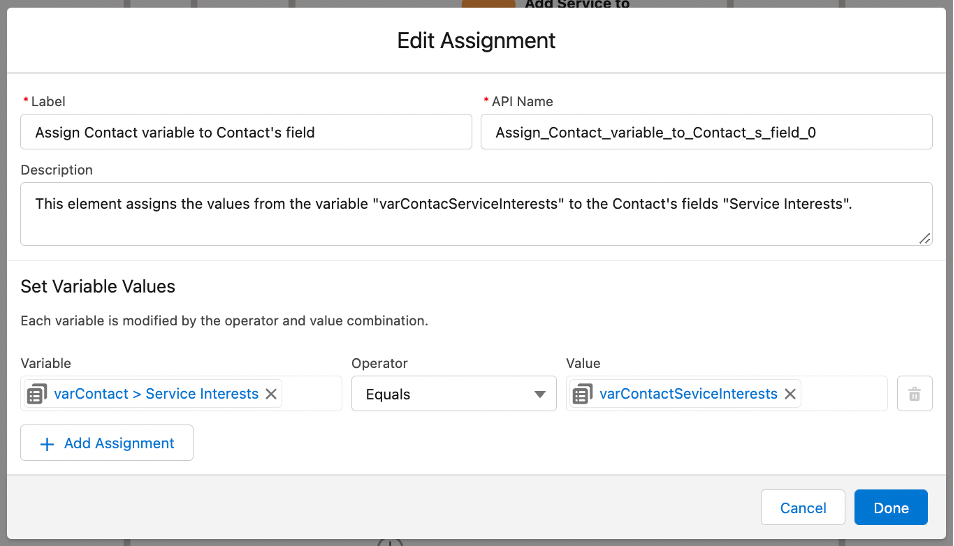
- Label: Assign Contact variable to Contact's field
- Description: This element assigns the values from the variable "varContacServiceInterests" to the Contact's fields "Service Interests".
- Variable: {!varContact.Service_Interests__c}
- Operator: Equals
- Value: {!varContactSeviceInterests}
3.15. Add an 'Assignment’ Element to the canvas with the following configurations:
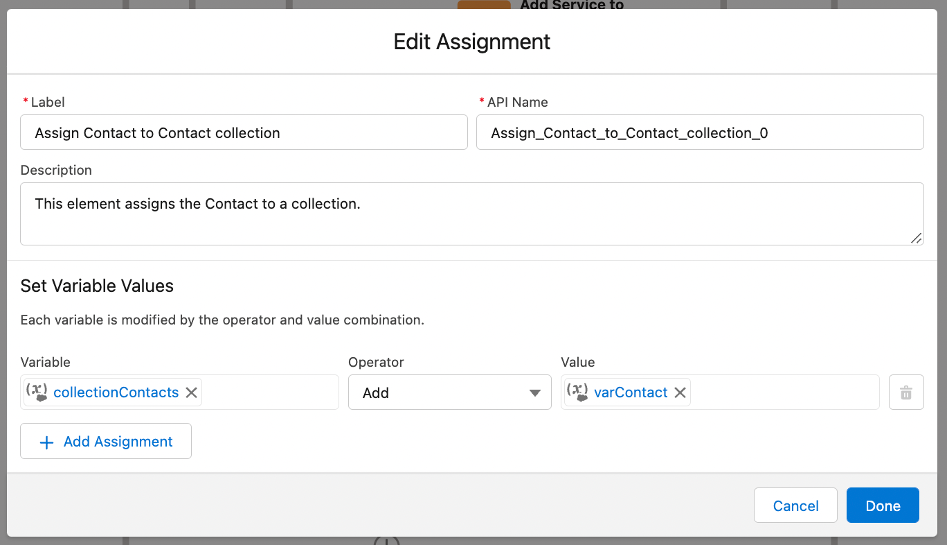
- Label: Assign Contact to Contact collection
- Description: This element assigns the Contact to a collection.
- Variable: {!collectionContacts}
- Operator: Add
- Value: {!varContact}
3.16. Add an 'Update’ Element after the ‘Loop Contact Roles’ Loop’s Last Item to the canvas with the following configurations:

- Label: Update Contacts
- Description: This element updates all Contacts that are part of collectionContacts.
- How to Find Records to Update and Set Their Values: Use the IDs and all field values from a record or record collection
- Record or Record Collection: {!collectionContacts}
3.17. Save the Flow and name it ‘Update Service Interests on Contact’ and activate the Flow


